

A Unity Event, or the UnityEvent generic abstract class is very useful for customizing GUI behavior. In this tutorial, I will show you how I’m using it for my game Lemonade.
I was trying to figure out what to do next on my game “Lemonade”. And after much thought, and a lot of wasting time, I decided to have a crack at making some better looking GUI, starting with how the GUI responds.
However, I didn’t want to use the default unity GUI components, like for example, the button component.
This meant that I would need to create my own scripts that use Unity’s EventSystems library, and implement a bunch of its interfaces.
This isn’t very complicated, but it’s something that people might not realize they could do, especially if you are a beginner with Unity.
So in this tutorial, my aim is to give you a good starting point for making your own custom GUI behavior scripts. This will give you more control over how your UI responds, and add some consistency throughout your game’s user interface.
Note: you can find the assets and code for this project here https://github.com/JoshuaFMarais/CustomGUIBehavior
What we will do
- Create an abstract class called “CustomGUIBehavior”. in it we will implement several of unity’s EventSystem interfaces
- Create a simple CustomButton class which will inherit from CustomGUIBehavior
- And lastly, we will create a custom inspector. This script will allow us to set what function we want to call, from the Unity Editor.
So let’s get our hands dirty with Unity Events.
1. The GUI behavior script
So to start off, let’s create our Abstract “CustomGUIBehavior” class.

As you can see, we are implementing a bunch of Interfaces,
like IPointerEnterHandler and IPointerClickHandler which are located in the
Unity EventSystems Library. Of course, you may not need all of these for your
project, as it entirely depends on what you need.
Also note that we are still inheriting from MonoBehavior, this is necessary as you won’t be able to attach scripts to GameObjects without it.

This part may not be required for you; but I think it’s a good idea to put each of your “States” in its own function, and then call them from the interface implementations, especially if you need the same state in
multiple situations.

In the image above, is the Core of what we are doing: the Interface implementations.
As you can see, we are simply calling our functions in the various interfaces, and letting the unity EventSystem deal with everything else.
You should notice that we are calling a “ClickAction()” function in the OnPointerClick() interface. We will declare an abstract function named “ClickAction()” Next.

Here you can see at the top of the script, the abstract “ClickAction” we just talked about.
And finally, there are the properties we will expose to the editor so that you have better control over what the graphic/button/image will look like in your game.
Notice that we are calling the “NormalState” function on awake, just to make sure that our button looks the way it should on play.
As well as getting TargetGraphic which is referenced throughout this script.
2. Our Custom Button Mono
Ok so now our CustomGUIBehavior is done, next we just need to make another script which can extend and override its available functions and use its properties.

This is all the code we need for our CustomButton script. All we do for now is inherit from “CustomGUIBehavior” and override “Init”, and “ClickAction”, We can now add whatever we want and it will be called when the user clicks the button. The button will also have all the functionality that customGUIBehavior has which I think is pretty cool! just imagine what crazy stuff can be done with this as a base!
When you attach this script to a UI object in your scene, you should see something like this.
Ok great! This is basically all you need to make your own custom GUI Behavior. But if you are up for it, there is one more thing we can do to make this button more useful and practical.
3. The Custom Inspector
If you have ever used the Button component that unity provides by default, then you know you can set what function(s) you want the button to call on click. Here’s a screenshot below for reference:

But! Since we made our button from scratch, we need to code this functionality ourselves. The custom editor script will help us take care of that. So, first we need to add a couple of things to our existing CustomButton script.
Updating The CustomButton Script
What this button will do
- play a sound when clicked
- Call a method that we select using the custom inspector we are going to create

Ok, so we’ve added a few properties to our little script. The first 3 are going to be used to serialize the function we want to call when the button is clicked.
For our button to know what function to call, we need 3 things:
- The MethodeInfo of the function
- What class or mono behavior the function belongs to
- And what game Object the mono behavior is attached to
I have also added an audio source property, which I am assuming is attached to the GameObject this component is attached to.
There’s also an audio clip property. I have created a resource folder, and put an audio clip in it named “click_sound”, so it can get it at run time if it is not set to anything.
and that’s about it for the CustomButton. So with that out of the way, lets get to that pesky custom inspector script.
What We Will Make
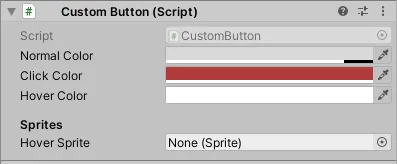
When we are done, this is what the our CustomButton component should look like in the inspector.
and when using a button in your game. you should only need to attach this component; no need for the default button!

At the top left, you can see I have set the target object to be a canvas, and set the selected Monobehavior to “TestCanvasMono” which is one of the components attached to the canvas. And finally, I have selected the function “PrintSomething”, which is a function inside the “TestCanvasMono” class. All of this means that you can select any function you want using only the inspector. And it will be called when the user clicks the button. as long as the function does not have any parameters (You can easily edit the script to support what ever parameters you need).
So now that you know what we will be making, let get to it!
4. Let’s Code!
A custom inspector script needs just a couple things to work:
- You must include the “UnityEditor” library.
- The custom inspector class we are making needs to be in a folder named “Editor” or else it won’t work
- You must include the [CustomEditor] attribute before the class decoration
- And the class must inherit from “Editor”

Basically, it should look something like the image above. But in our case, we need a few more things, like the “System.Reflection” library, which will allow us to scan classes and see what’s inside.
We will also get a reference to the target MonoBehavior and store it in the variable “mono”.
I won’t explain every little detail of these scripts, because some of it is basic c# stuff. So this is where some basic c# knowledge will be helpful. Otherwise, you can download this project from my git hub or just take a look at the code in its entirety.
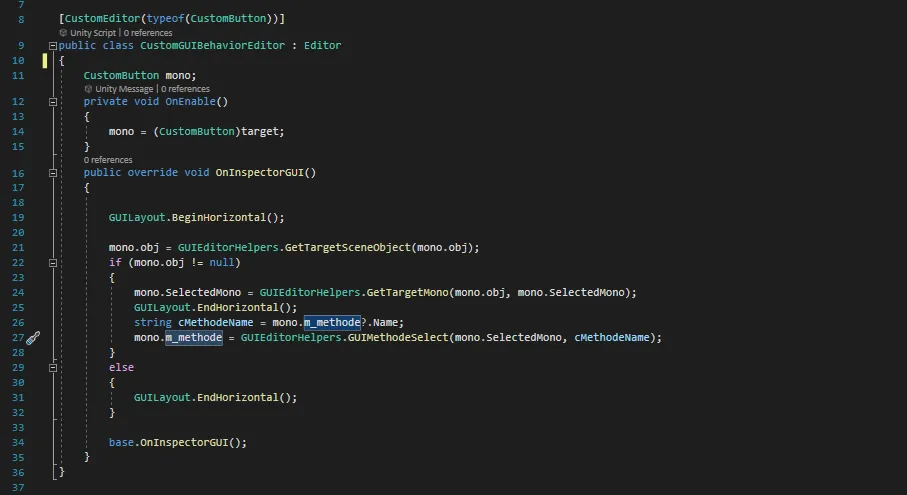
This is what our editor script should look like, don’t worry about how this works for now, because it should be clear after we make the next, and final class! For now I’ll say that it simply makes use of 3 functions which we need to code.
If you look at the image above, you should see that we are using a static class named “GUIEditorHelpers”, This is what we now need to create to make the magic happen!
GUI editor helpers
All of the code you see next, will go inside the static class shown bellow.

Just for reference, you will see red lines on some of the images bellow, corresponding to the list(s) below them.
GetTargetMono

All this one needs to do is use the EditorGUILayout class to make an Object Field show up in the inspector, and return the object the user selects
GetObjectNames

This function is not that important. But I wanted to make it easy to convert all objects in an array, into an array of strings. As I/you may need it often when making popups.

This function will display a popup, with a selection of all the monobehaviors attached to the “TargetObj” in the function’s parameters. And allow us to select which one we want.
Let’s break it down
A. We first get all of the monobehaviors on the object using the “GetComponents” function
B. If “currentMono” is equal to something; we need to try and find the index of the mono behavior its referencing. However, since you are able to change the order of the components in the inspector, and you may remove and add components at any time; We cannot guarantee where the current Mono will be in the array. That’s why, we use a for-loop to go through all the mono behaviors attached to the “TargetObj” and find the index by TYPE. If nothing is found, the index will just stay 0
C. We then get the new “current index” using the Popup function
Lastly, we simply return the mono behavior.
GUIMethodSelect
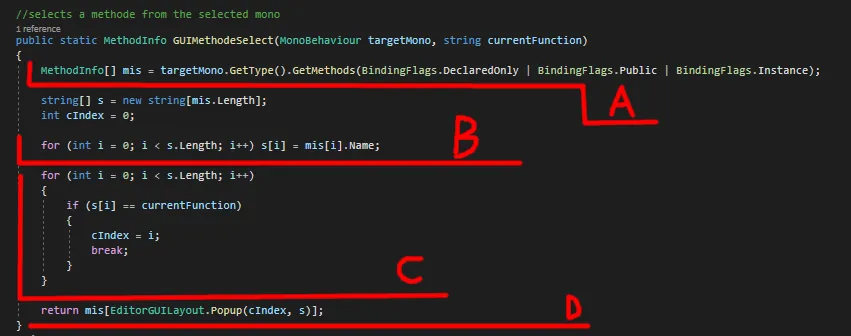
This is the last function we need to make. And is the reason we are using the “Reflections” library.
a. We use the “GetMethods” function found in the reflection library to get (you guessed it) all the methods inside the “targetMono” passed in to this function. I would recommend looking in the Microsoft docs to get more detail on how this function can be used, but I’m sure messing around with different arguments will work too 🙂
b. We then need to get all the names of these functions to display in the inspector
c. We search for the index of the method already selected (if there is one). Just like we did in “GetTargetMono()”.
d. And lastly, we use the almighty Popup Function to select the method we want, or change it.
Using one of my own sprites this is what it looks like when in game. Its simple but you can do much more with this method. By the way I know the sound FX is terrible! But its what I had lying around and I’m to lazy to get a good button click sound, so anyway…
And now we are Done! I hope this made enough sense and opened your mind to the enormous possibilities available when making your own behaviors and custom inspectors.
Also don’t forget that you can get the code from my GitHub.https://github.com/JoshuaFMarais/CustomGUIBehavior And I recommend doing so, as its a great way to learn or use as a base for your own creations.


