Balloon generator in Unreal Engine – Learn how to generate balloons that will respond to the touch in your scene.
Hello! This is my first tutorial ever so I hope you’ll find it useful. ^-^ Today we’re gonna make a balloon generator* system in Unreal Engine 4.24! Ever wondered how your birthday party would look like if you’d have a realtime balloon generator to use with no limits? So, this is the tutorial for you!
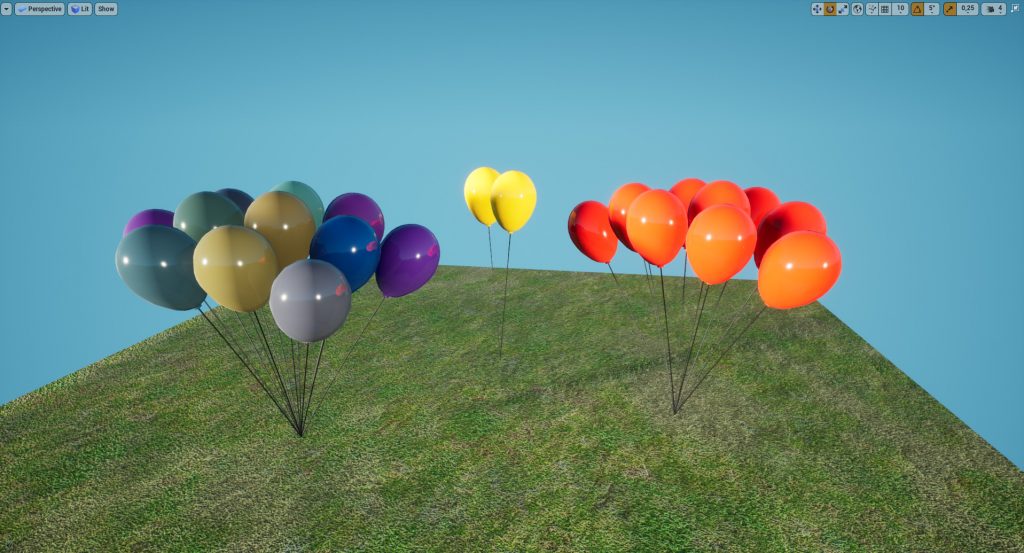
We’ll generate balloons of all colors with physics implemented and cable component to make them swing if touched in the scene!
*Scary clowns not included
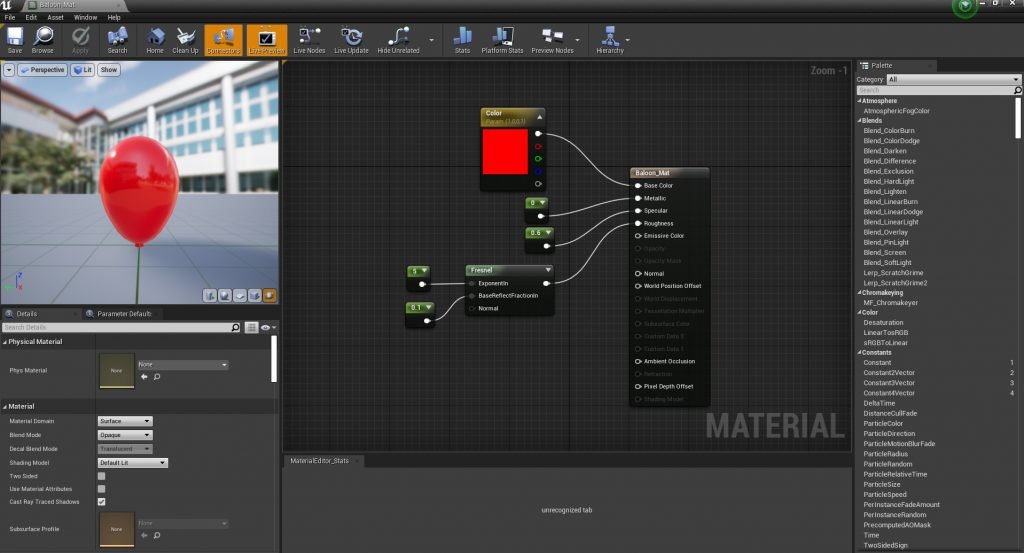
First of all, we need to create a balloon geometry (every modeling software is just fine) and we make a new material inside UE4 that we will call “Baloon_Mat”. This time we’ll keep it simple like this:
***Important note: we will make the vector3 node at base color as a parameter and we will call it “Color”, this will allow us to randomize balloons color runtime ***
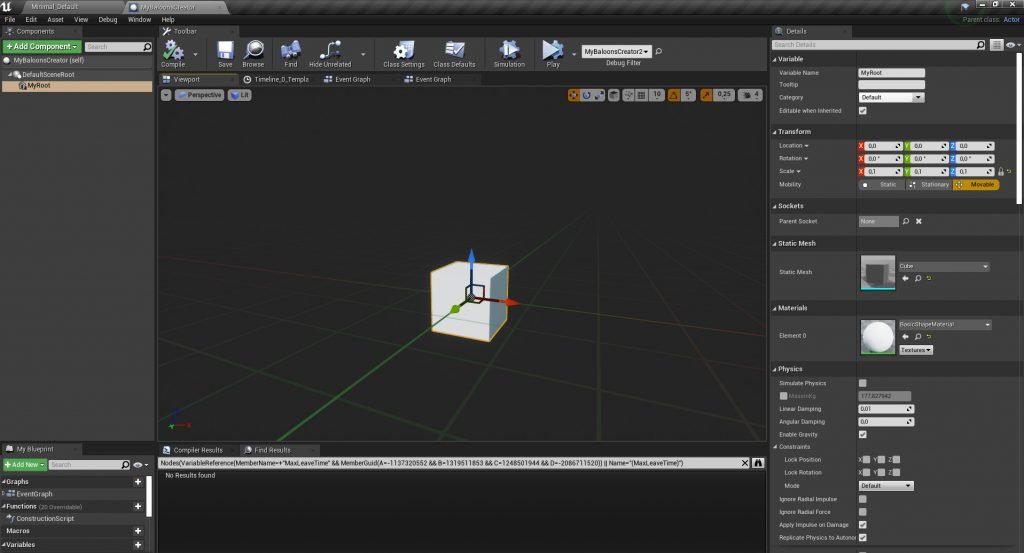
Now we start to play, let’s create a new actor blueprint and call it “MyBaloonsCreator” (that is not a new religion but just a new blueprint that we’ll use to generate balloons). We just need to add one static mesh component (as like a cube) to make a new root easier to see while we place the BP in the scene and to easily attach cable components we’ll generate runtime later on. Also make sure that Collision Presets is on “BlockAllDynamic” on this component, or physics won’t work properly.
Now we need to create some variables with all the parameters we want to specify for the balloons, then we will expose all those variables by clicking on the little eye nearby to allow us to modify them while in editor. So we’ll create:
– an int variable called “BaloonNumber” to determine how many balloons do we want to generate (default 0) – a float “Z_Offset” for establish how high are balloons from the floor (default 100) – a float “CableWidth” to determine the width of the cables that will connect balloons with the root on the ground (default 1) – a bool “RandomizeColors?” to check if we want random color for the balloons – a linear color “BaloonColor” to change the color
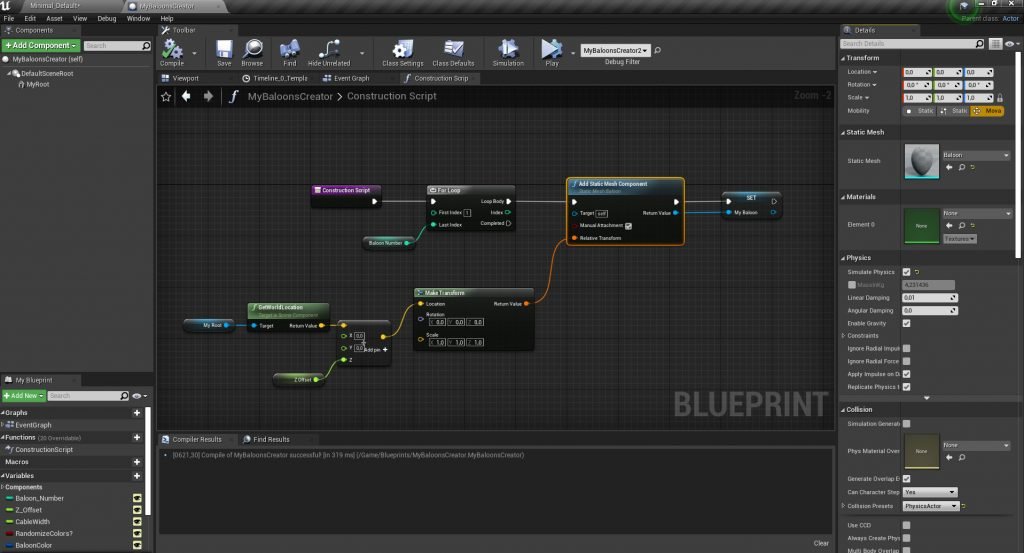
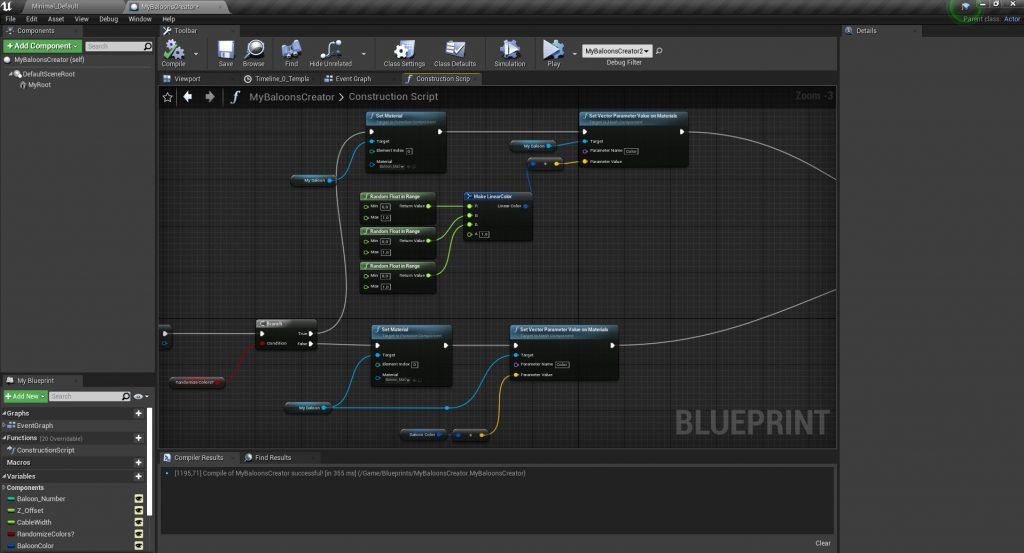
Now we go in the construction script and start to generate balloons. First of all we need to take “BaloonNumber” int and put it on the last index of a ForLoop cycle: this will allow us to cycle code as many times as the variable index is.
Then we will use the function “add static mesh component” where we will set the balloons geometry at the world location of the component “MyRoot” plus the ZOffset for the balloons altitude from the ground. Let’s promote the return value to the new variable “MyBaloon” that we will use later to store our balloons and for other cool things.
*** Important note: in “Add Static Mesh Component” function make sure in the static mesh properties you check true “Simulate Physics” and make sure this will set “CollisionPresets” of the mesh to “PhysicsActor”. This will made our balloons to simulate physics properly to make them float later on ***
Ok now we will work on color, so let’s create a branch with the bool “RandomizeColors?” and simply on the FALSE case we will: take “MyBaloon“, set “Baloon_Mat” to it, use function “Set Vector Parameter Value on Materials” to it by using “BaloonColor” linear color variable and the parameter “Color” we previously created in Baloon_Mat. On the TRUE case we will do just the same thing, except that instead of using “BaloonColor” we will use random float in range and then MakeLinearColor to make random decision on which color each balloon should have.
Now things get a bit complicated because we need to work with physics components, but don’t worry about that, we’ll solve that brutally with screenshots. You just need to know what we will do:
FIRST PART IN THE CONSTRUCTION SCRIPT – we need to add constraints to make a connection between the ground and the floating balloons, so we need to create that component and to promote it to “MyConstraint“.
– Each balloon must be anchored to the ground (the root of our BP). To do that we need to set a constraint component and assign which elements must be connected together. So MyConstraint will be our target (the constrain component), in which “MyBaloon” will be connected to “MyRoot“.
– we then need cable component, to create balloon wires for a more realistic result
*** Important note: we will store all generated balloons and cables in two arrays “MyBaloons” array and “MyCables” array, this is necessary to take and use all of them in the next part ***
*** Important note: in “Add Physics Constraint Component” I locked all LinearLimits and make Free all Angular Limits, but you can tune them as you want for better results ***
LAST PART IN THE EVENT GRAPH
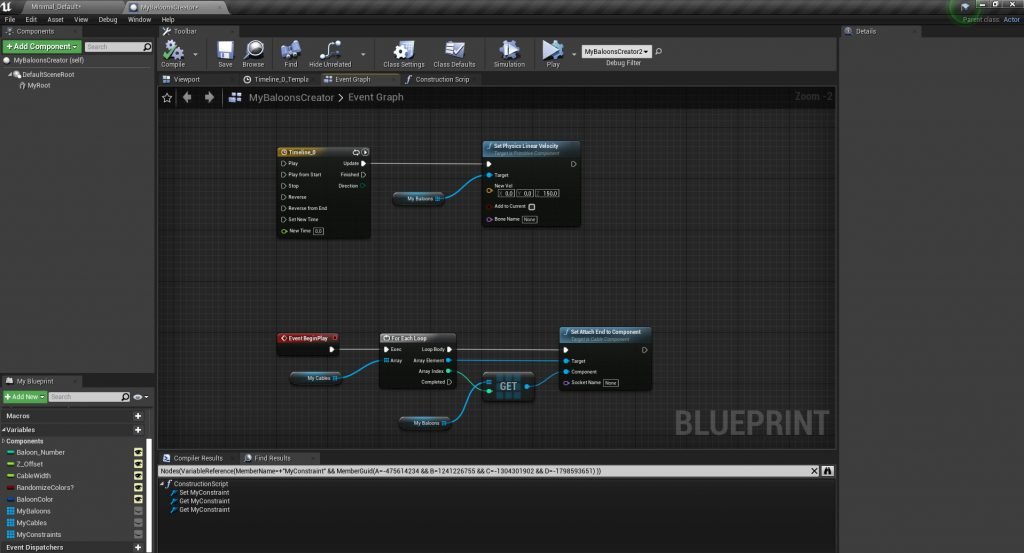
For the last part we need to use the event graph, this is to make balloons float in the air and to connect them to the End of the cable components that generates when play the game.
– In the begin play we take all our generated cables and for each loop we set attach end to each generated balloon.
– To make balloons float, we just create an empty autoplay-loop timeline (just to cycle the flow as the event tick but more performant) and we take all our generated balloons and set for them physics linear velocity up Z, this will drag them a force in the air.
That’s it! Now we can drag our “MyBaloonsCreator” blueprint in our scene and changing our parameters, press PLAY and enjoy the final result! If you want to have fun go on simulate and drag around the blueprint to see balloons floating and interact each other! I suggest to start on a low value of BaloonNumber because if you go too high the editor could crash! So don’t exaggerate