Tutorial How to Make a Jump Pad in Unity
Jump Pad in Unity 3D – Jump pads or bounce platforms are a cool feature typically found in platform games. They’re very easy to implement on Unity 3D. Let me show you how.
I’m working on the game The Legend of Namuria and some people on Twitter asked me for a short tutorial on how I implemented some of its features on Unity. Here we go. In this short tutorial I will explain how I made the jump pads for my little main character to bounce off of.
Prequisites: Basic Unity knowledge. I will not explain here how to create a scene or a player controller with jumping logic.
1. What do we want and how should it work?
First of all we need to have an idea of what we want the jump pad to do and how it could possibly work.
The basic idea is that there is an object with a flat surface (the jump pad) which will shoot the player with a defined force in the vertical direction of that flat surface, like shown in the following illustration:
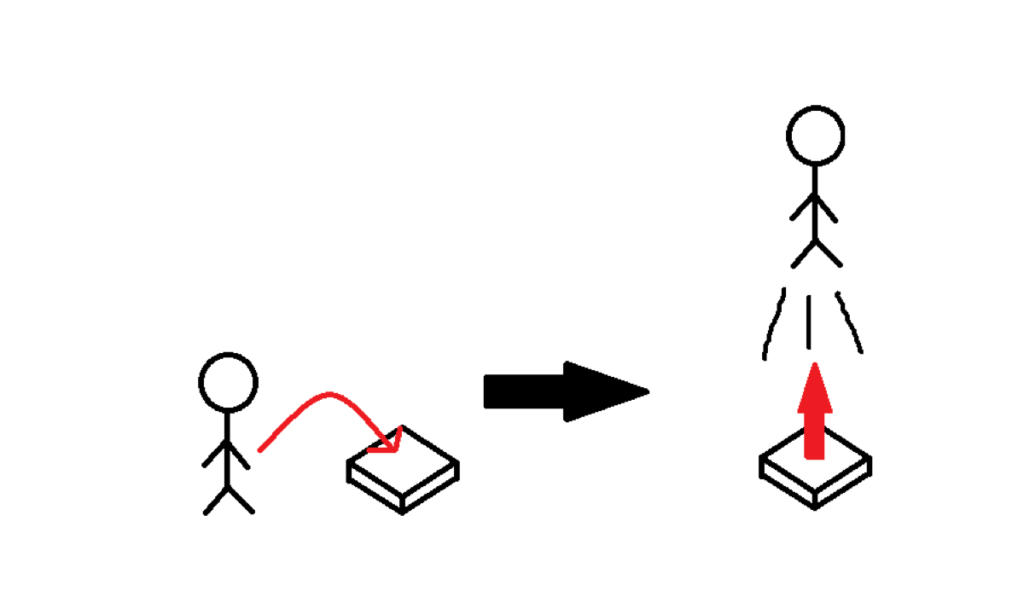
The direction in which the player will be shot should always point 90° vertically away from the jump pad, not to another direction.
In order to achieve this we need to write a script that applies this force to the player and add it to the jump pad.
2. Creating the jump pad object
First of all, we require a jump pad object and to keep it simple, we will use a cube.
Start the Unity editor and load a scene (ideally already with a player and at least a plane to walk on), right click in the hierarchy of your scene and choose Create 3D object -> Cube.
Scale the cube to be a little wider and longer than your player’s diameter and place its surface a little above the surface of your plane (see following picture).
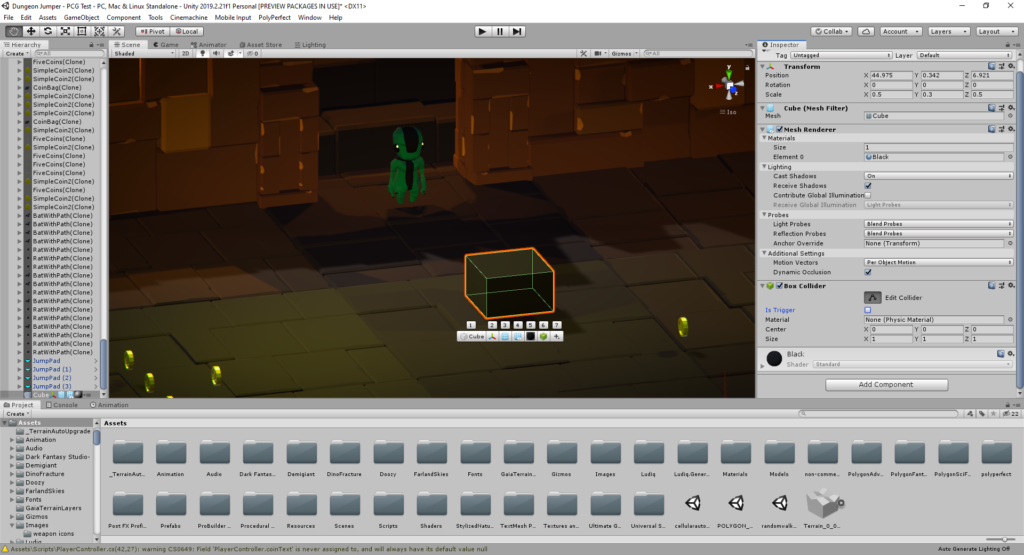
Also make sure that the Box Collider component is attached and is NOT a trigger.
The easiest way to create a jump pad would probably be to just add a bouncy Physic Material to the cube but this would repel the player into any direction, not only in a desired one.
3. Writing the JumpPadController.cs script
So the next thing we want is to create a script for our jump pad cube. Go to your project/assets/scripts folder, right click in the project explorer, create a new C# script with Create -> C# Script and name it JumpPadController.cs.
Double click the newly created script to open it in your code editor.
Above the MonoBehaviour class we will need to add the following libraries:
using System.Collections;
using System.Collections.Generic;
using UnityEngine;
Now, we need some variables:
public GameObject player;
Vector3 direction;
public float jumpForce = 5f;
We won’t need the Start() method, so delete it. Inside the Update() method we will create a Vector in the direction of the jump pad’s y-axis, like this:
void Update(){
 //generate vector in the direction of jump pad's y axis multiplied with a factor jumpForce
direction = transform.TransformDirection(Vector3.up*jumpForce);}
Of course you could also use the Start() method instead when your jump pads won’t ever move nor rotate but to have more flexibility we will put it into Update().
The jumpForce variable will make the direction vector longer which will directly translate into the force that will be applied.
Now that we have created the direction vector we need to apply a force to the player to shoot him away when he hits the jump pad. For this we will be using the OnCollisionEnter() method, will get and assign the player gameObject and add the force to it:
void OnCollisionEnter(Collision collision)
{
if (collision.gameObject.CompareTag("Player")) //applies only to objects tagged with “Player”
{
player = collision.gameObject;
//apply force to the Player's rigidbody to let him "jump"
player.GetComponent<Ridigbody>().AddForce(direction, ForceMode.Impulse);
}
}
This makes our script complete and it can be saved and be attached to the jump pad.
4. Attach and assign all required components
Back in the Unity editor we can just drag the script from the project explorer to the jump pad object or add the script from the inspector (see following picture):
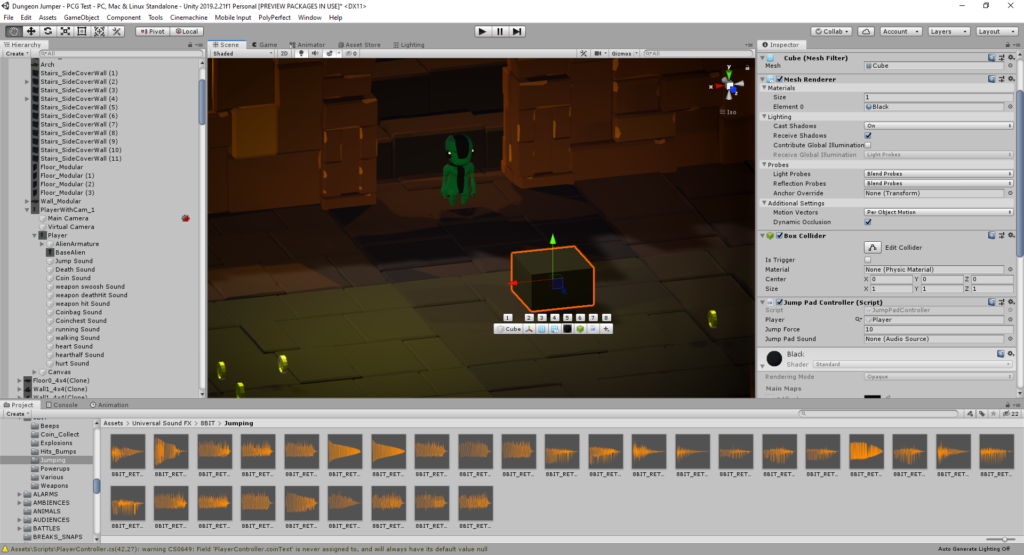
Here we can assign the player model (which is not necessary because we are assigning it already in the JumpPadController.cs script!) and the force that should be applied to the player. The required amount of force is depending on your player’s mass, the gravity setup for your project and the height from which the player will jump on the pad. This needs to be figured out by testing!
To be able to apply a force to the player model it also needs to have a rigidbody attached to it (see following picture):
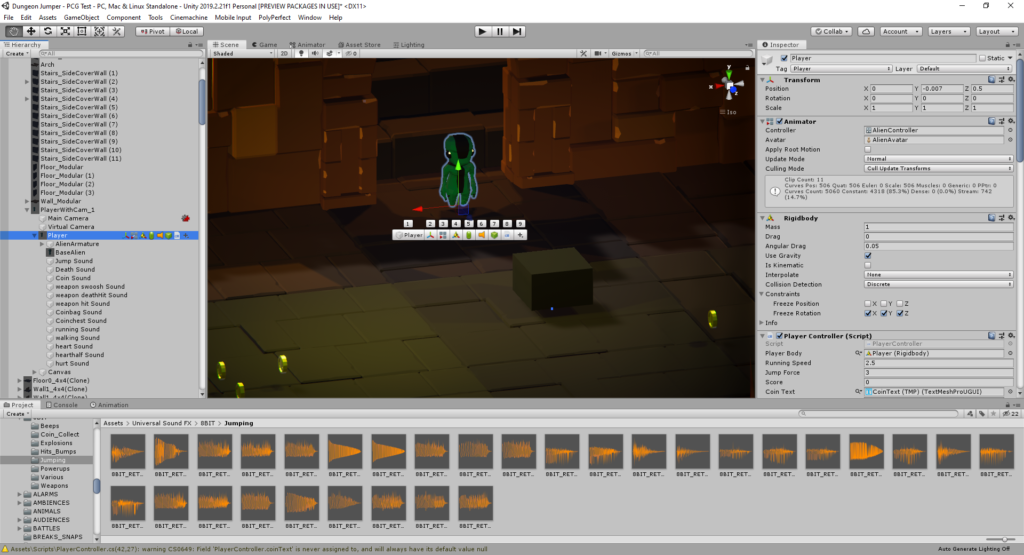
Here we can setup the mass, if gravity will be used (check it!) and some other settings which are affected by Unity’s physics simulation system. You should also freeze all rotations to avoid any unwanted rotation of the player model when a force has been applied!
Also make sure to assign the tag “Player” (or whatever you have entered after collision.gameObject.CompareTag inside the OnCollisionEnter() method) to the player, so it can be recognized by the JumpPadController.cs script.
Now we are ready and can test out our newly created jump pads!
Thanks for reading and happy jumping!
If you want to know more about The Legend of Namuria and/or any other game projects I’m working on you can follow me on Twitter:

